Owning a box truck comes with responsibilities, and one of the most overlooked yet crucial maintenance areas is the corner cap. Over time, trucks are exposed to weather, constant movement, loading stress, and occasional impacts, which can cause damage. That’s where Box Truck Corner Cap Repair becomes essential. Ignoring small cracks or leaks can lead to more serious issues like water intrusion, rust, and costly structural damage.
In this detailed guide, we’ll explain everything you need to know about box truck corner caps, common problems, repair steps, tools required, and preventive measures to extend the life of your vehicle.
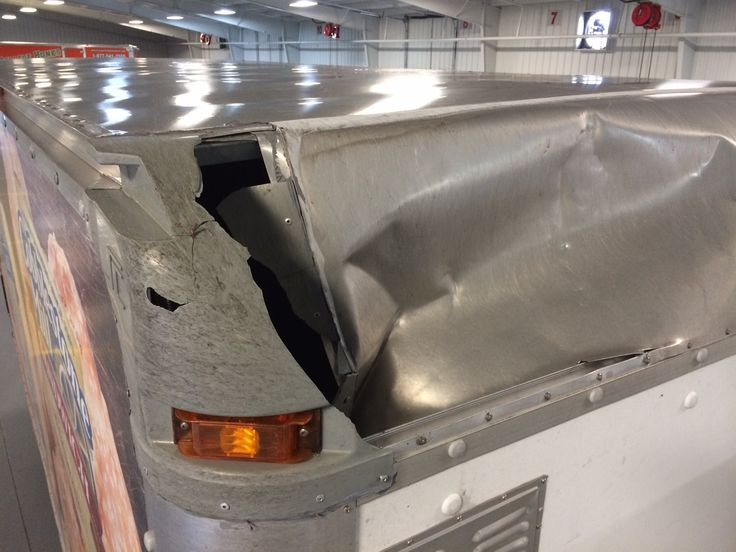
What is a Box Truck Corner Cap?
The corner cap is a structural piece usually made of fiberglass, aluminum, or composite material, located at the top corners of a box truck. Its primary functions include:
- Sealing and waterproofing the roof edges
- Protecting structural joints from weather exposure
- Maintaining aerodynamic shape
- Ensuring cargo safety by preventing leaks and rust
Because it plays a major role in keeping your truck secure and functional, timely Box Truck Corner Cap Repair is a necessity.
Common Issues Leading to Box Truck Corner Cap Repair
Even durable trucks face wear and tear. Here are the most frequent issues:
- Cracks in fiberglass caps – often caused by impact or weather changes.
- Water leaks – moisture seeps into cargo space when seals break.
- Loose or missing rivets – leads to gaps in the structural frame.
- Rust around fasteners – particularly in steel-framed box trucks.
- UV damage – sunlight causes brittleness and fading over time.
Read too: Franklin Truck Parts Near Me: Your Complete Guide to Local Truck Parts & Repair Solutions
Box Truck Corner Cap Repair – Step-by-Step Guide
When it comes to Box Truck Corner Cap Repair, the process depends on the material and extent of the damage. Below are general steps:
1. Inspection
- Look for visible cracks, gaps, or water stains inside the cargo area.
- Check rivets, seams, and caulking around the corner cap.
2. Preparation
- Clean the damaged area with soap and water.
- Remove loose paint, sealant, or rust using a scraper or wire brush.
3. Fiberglass Corner Cap Repair
- Sand the damaged surface to create adhesion.
- Apply fiberglass resin and cloth to patch cracks.
- Smooth out bubbles and allow to cure.
- Sand again and paint to match.
4. Aluminum Corner Cap Repair
- Drill out loose rivets and remove damaged sections if necessary.
- Use replacement aluminum patches with rivets or adhesive sealant.
- Reseal all edges with waterproof caulk.
5. Sealing and Waterproofing
- Apply high-quality silicone or polyurethane sealant.
- Ensure all seams and rivets are watertight.
6. Final Check
- Spray water over the repaired area to test for leaks.
- Repaint or coat as needed to protect from UV and corrosion.
Tools and Materials Needed
For a successful Box Truck Corner Cap Repair, you’ll need:
- Rivet gun and rivets
- Caulking gun and sealant
- Fiberglass repair kit (resin, cloth, hardener)
- Sandpaper and grinder
- Drill and bits
- Protective gear (gloves, goggles, mask)
Professional vs. DIY Box Truck Corner Cap Repair
DIY Repair
- Pros: Saves money, immediate fix, hands-on learning.
- Cons: Time-consuming, requires tools and skills, risk of improper sealing.
Professional Repair
- Pros: Expertise, warranty on repairs, faster completion.
- Cons: Higher upfront costs.
If the damage is extensive or involves structural elements, professional repair is strongly recommended.
Cost of Box Truck Corner Cap Repair
- DIY fiberglass patch: $50 – $150
- DIY aluminum rivet and sealant: $80 – $200
- Professional repair: $300 – $1,000 depending on severity
Considering the cost of water damage to cargo or frame rust, timely repair is a much cheaper investment.
Preventive Maintenance for Box Truck Corner Caps
To reduce the need for frequent Box Truck Corner Cap Repair, follow these tips:
- Inspect caps every 3–6 months.
- Reseal rivets and seams annually.
- Wash and wax the truck to protect from UV.
- Store indoors when possible.
- Fix small cracks immediately before they spread.
Box Truck Corner Cap Repair – Why Timely Action Matters
Delaying repairs can lead to:
- Cargo damage from water leaks
- Rust spreading to structural beams
- Higher repair bills later
- Reduced resale value of the truck
A small crack today can turn into a major leak tomorrow, so addressing issues promptly saves money and keeps your truck reliable.
Conclusion
A Box Truck Corner Cap Repair may sound like a minor task, but it plays a huge role in extending the life and efficiency of your vehicle. With proper inspection, regular maintenance, and either DIY or professional repairs, you can keep your box truck in top shape. Remember, the corner cap is the first defense against water damage and structural wear – take care of it, and your truck will take care of your business.
Leave a Reply